Showing posts with label CSS. Show all posts

Creating The Apple Mac "Finder" Window Effect In CSS

Hey

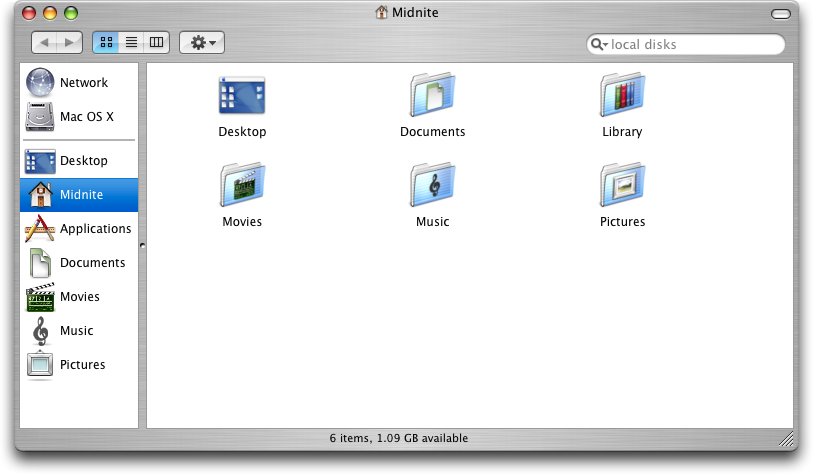
This is a pretty simple tutorial that will enable you to create a web page that mimics the look of a Finder window within an Apple Macintosh system. It really doesn't take a lot of doing but is very useful for beginners. The ideas behind this tutorial is to create a couple of divs and set the background images to correctly render the desired images. The final images can be changed later to suit any page you want but the principle effect stays the same. As a final touch there will be some font and text styling to match the windows. At the end if you want to test it out you can download the source pack. I have also added all of the sources images that I used.

Step 1) The first step is to find and download a basic Mac window. The one I have used is from the previous version "Panther". The new "Leopard" version has change the window about so I can't use it. Anyway, the one I have found was from here. A blanked out version is shown below. I have also removed the small buttons that are present on the window.


Step 2) The next step is to slice up the image into 3 sections. The header, body and footer. I've done this in Photoshop, but nearly any software can do the tick. Cut the image as shown in the image below. If you want to be extra cool (and create a better page) reduce the vertical height of the middle image, this can be done by squashing the image or cropping most of the image out.


At this point on there wont be to many images, just text, so if you get a bit confused because I haven't explained my self clearly enough please leave a comment and I will try and help you out.

Step 3) At this point you should have your three images, it is now time to turn them into a HTML page. The idea behind this is that the centre part of the page is allowed to stretch and then the bottom and top images added (purple). Small divs will be inserted inside for the text (green), as shown in the image below.


There for the first step is to create the blank html page. Add in a head, style and body tags and properly close them. I would show you here but blogger makes it difficult to add such html (even as a quote) it screws it up. Showing an image is just annoying.

Step 4) The next step is to define the main divs. Open a new text file and save the document as .html. As a practice I use is to create the shell, make sure that it works and then add in all of the detail last. Create 4 style elements within the style tags. Add the following text:

body {
font-family:"Lucida Grande",Geneva,Arial,Verdana,sans-serif;
font-size:12px;
font-size-adjust:none;
font-style:normal;
font-variant:normal;
font-weight:normal;
line-height:18px; }

#outerwrapper {
display:block;
width:813px;
margin:auto; }

#header {
display:block;
background:url(http://i5.tinypic.com/8gdsu4l.jpg) no-repeat;
height:38px; }

#mainbody {
display:block;
background:url(http://i15.tinypic.com/81068gl.jpg) repeat-y;
}

#footer {
height:57px;
display:block;
background:url(http://i14.tinypic.com/8e0ujyw.jpg) no-repeat;
}


The body style will apply to the whole page, this is the font styling this isn't need right at this minute. The outer wrapper style is used to house all the remaining elements, this also enables the whole thing to be centered. The header, main body and footer are all styles with background images. The background images are hosted on tinypic for ease of use. They all have different sizes and different repeats to enable this effect to happen. If you want to find out more go visit the w3schools webpage for more information.

Step 5) We have our styles we now need to add them to the page. If step might be a bit difficult to explain due to the blogger restraints. I will try my best. The first div to add in the body of your text is the outer wrapper, add div id="outerwrapper', makes sure you close the tags with the appropriate tags (<>) and the trailing end div tag (/div).
Within this div add the header, main body and footer div's in the same manner. If you view the page in any browser you should end up with something that looks like this.


The middle part doesn't appear since there is no information inside the div, as a result it doesn't appear. The top and bottom images appear due to the size constraint set.

Step 6) The next step is to add a main piece of text. This will be done inside a div so the dimensions and placements can be sorted. Within the style sheet add a new style using the text below.

#text {
display:block;
padding: 0 25px 0 25px;
}

Step 7) The reason the padding is added will be come apparent in a second, is it used so the boarder of the image doesn't have text on top of it. To add in the text div place it in between the mainbody div and its end tag, use the same formatting. To test the div out head over to the lorem ipsum generator and copy and paste some text in the text div. If you have added in the divs correctly you should have something that looks like this.


Step 8) The last steps are to add in two divs for the title and the footer for dates or something similar. To do this add in the following styles. These are for the divs. The styling is added so the elements appear in the right place.


#title {
margin:auto;
width:500px;
padding:5px 0 0 0;
text-align:center;}

#bottom {
margin:auto;
width: 500px;
padding: 12 0 0px 0;
text-align:center;
font-size:10px;}


Step 9) The final step is to add in the required divs. Place the title div inside the header div and the bottom div inside the footer div. Add some text to test if it works. If all is correct it should look something like this.


If it doesn't look like that try downloading the source pack and looking at the html file. Alternatively you could download Firefox, as this will render the CSS correctly, Internet Explorer doesn't do CSS well.

How To Build A Webpage In CSS (A Round Up)

Hey

If you hadn't noticed over the last couple of days I have been writing a very simple tutorial on how to make a web page in CSS (Cascading Style Sheets). It is very easy to complete, but due to time constraints I had to break the tutorial up into a couple of steps. This post is going to serve as a round up and a general links page for each of the tutorials.

The tutorial was split up into 6 parts. More than I really liked but it gave the chance to split things up. The 5 parts were:
  1. Introduction
  2. Setting Up The Initial Site
  3. The Header
  4. The Main Content Wrapper
  5. Fonts and Finishing Off
If you have any comments at all please leave one below. If you want more information please check out the W3School page, they have loads of information on CSS and are a great help.

Creating A Basic CSS Webpage (Part 5)

Hey

We are moving on. In the last tutorial we got both of the left and right content div's set up. At the moment it doesn't look very pretty, so we are going to spruce it up a bit with some font styling. This ranges from the very simple, to the very complex. I'm going to make it as a simple as possible. This part of CSS isn't my favourite so I am going to make it as easy to do and as simple as possible.

Step 1) This best to to define a font styling is at the "very top". This means that you define one style for the whole document and then change it as necessary. This is using the inherit properties that are present within CSS. There fore to start we will use the body style and define some values. Like so:

body {
font-family:Tahoma, sans-serf;
font-size: medium;
text-align: left;
}
Notice that it doesn't have the hash (#) sign in front, this is a very special type of style that is linked to the html tags. For example anything that is within the body html tags will have that style applied.

The font family is the type of font that is going to be applied, in this case Tahoma and then any sans-serif font if Tahoma is not installed, the result of this means that it will not have any curly bits on the ups and downs to a font. You can name as many as you want, but try to keep them within one style.

Font-size and text-align are pretty self explanatory, these are used for the aligning of the fonts and the sizes. For more detailed information look here and here.

Step 2) Everything looks that same at the moment. The header text that goes inside the header div (add some if you haven't) needs to stand out. Its very simple, all you have to do is fiddle about with the CSS styles and add them to the existing styles like so.

#header {
width:700px;
height: 200px;
background:#808080;
margin-bottom:10px;
font-size: 200%;
text-align: center;
padding-top: 20px;
}
This makes some nice big text.

Step 3) If you ever want to off set some text from the edges of the div you need to use the padding option. Its very simple to use but involves a bit of math. All you have to do is use the padding syntax (padding: 5px 10px 5px 10px;) but then minus the width numbers (10px and 10px, remember you go around in a box). Then you take away this total from the width of your original box. It was 500px (for the left) it is now 480px. You have to do this to stop the divs being pushes out and ruining your layout.

Hopefully this should have helped, i'm going to do a little round up soon for what we have learned. If you are stuck please leave a comment.

Creating A Basic CSS Webpage (Part 4)

Hey

This part of the tutorial will be designed to show you how to make the content wrapper and the left and right elements of the page. It is very easy.

Step 1) Using the previous code we need to create a wrapper that will contain the left and right parts of the content. Apply the following style.

#content {
overflow:auto;
width:100%;
}

This makes sure the overall dive stretches as the content grows.

To make the wrapper add the following code underneath the header wrapper as shown below.

div id="content">
/div>


So it looks like this.

div id="wrapper">
div id="header">
/div>
div id="content">
/div>/div>


This means that the content wrapper is underneath the header but still located in the wrapper div. There is no need to give this div any properties, it is just used to hold the next elements in. It also makes it easier to re find code because you can easily search for the content wrapper.

Step 2) The next step is to make the left and right div for use as the main content and sidebar content respectively. We first need to make a new style for each of the elements. I'm deviating from the original plan slightly. In the image I whipped up I had the main div inside another div, this is not needed. So I am leaving it out.

The style for the left and right divs are shown respectively. They are pretty much similar.

#left{
float:left;
width:500px;
background:#DDDDDD;
display:block;}

#right {
float:right;
width: 200px;
display:block;
background:#707070;}


Notice the "float" syntax this will be used to float the div's left and right respectively. You can name the div's to something more suitable such as sidebar. I've used those names for clarity. You need to make sure the widths are correct and add up to the size in you sidebar, otherwise there will be elements all over the place. You also need to make sure that display:block is displayed so the div fills all the way up when something is added.

Step 3) The next step is to add in the div's. They both need to be added inside the content div. As shown below. Tabs haves been added for clarity.

div id="wrapper">
div id="header">
/div>
div id="content">
div id="left">
/div>
/div>
/div>


If you view it you wont see anything. This will be solved in the next step.

Step 4) In the wrapper style remove the height syntax line and add in teh overflow line. It should now look like this.

#wrapper {
width:700px;
background:#ffe2e2;
margin:50px auto;
overflow:auto;
}


Step 5) All you now need to do is add some text between the id and the end of the div tag as shown below.

div id="left">
This is left Text
/div>
div id="right">
This is right hand text
/div>

The more you add the bigger the div will come and we are in business.

You don't no how long I spent trying to make the wrapper div stretch, the problem was down to the floating elements and as a result the outer wrapper div was not playing ball. I found out how to do it eventually from here.

The next tutorial will be making it look more pretty.

How to Build A Basic CSS (Part 3)

Hey

In the previous part I showed you how to create the basic wrapper for a CSS website. If you haven't caught up its very simple you can find it here. This episode will be about creating the header. I'm sorry but this series isn't going as quick as I liked due to the time constraints.

Step 1) The first step is to create a new style. Like you have done with the wrapper one needs to be created for the header this again is done in the style section. I am going to call it header. I wanted this to cover the whole wrapper. To save a bit of time i've put the whole code below.

#header {
width:700px;
height: 200px;
background:#808080;
margin-bottom:10px;
}


What this code means is very simple. The width of course means it fills the whole wrapper, the height is how high I want the div. Background is the colour I want to use. If you want to use a background image you can use this bit of code.

background:url(/image/loaction.jpg);


The margin is for used later for the lower elements.

Step 2) The next step is to nest the div. This needs to be placed inside the header and is very simple. You need to put the div inside the wrapper div like shown below. (You need to add in the leading arrow because blogger is playing up.

>div id="wrapper">
div id="header">
/div>
/div>

I'm sorry it was a bit short but I really don't have the time, if at all possible I may do one tomorrow. So sit tight.

How To Build A Basic CSS Webpage (Part 2)

Hey

Lets get this ball rolling. This part of the tutorial will be used to make the wrapper div. Due to time I wanted to more. But i'm going to split it up into different parts. If you missed the introduction you can find it at part 1.

If you are ready to begin fire up your text editor and prepare to code.

Step 1) The first step is the basic construct of a website. Since this is only a bit of practice i'm not going to fiddle about with doc types or titles for a website. This is only going to be about pure CSS and HTML coding. I'm only going to use simple colours although you can fill these in at any time.

To start off add the following code to you text editor (known as editor or TE from here on). Its a basic layout for a blank HTML page, save it when you have done. To save, you can either save it as a .txt and then open it in a web browser or you can save it as a .html and then let your computer open it automatically. It doesn't matter. You will need to remove the spaces between the tags and add some in, blogger wasn't accepting the code directly for some strange reason.

< html
< head
< style
< /style >

< /head >
< body
< /body >

< /html >


The two points we are interested in are the style and the body tags. We first need to define a style for the wrapper. The wrapper will hold all of the other elements in place. This for ease of use will be centered. Size really doesn't matter but the width is going to be about 700px. A height will be added initially since there isn't any content.

Step 2) The wrapper needs to be defined we are going to use a div element with and id. An id is done through the hash (#) symbol and then an name. The specific coding is opened and closed with curly brackets {}. To start with the first element write the following code in the style tags.

#wrapper {
}

The wrapper is now defined and we can start to build it up.

Step 3) A size is needed, this is done through the height and width properties. Correct syntax for CSS includes two elements a property and then a value you will see in the next bit of text how this is done.

To specify a size add the following code, notice the colon and semi-colon. A height is added since there currently is no content. This can be removed later. If you view it you will not see anything, this is the next step.

#wrapper {
width:700px;
height:900px;
}

Step 4) White on white is a bit boring. Lets add some colour. To do this use the background value. A background can either be a colour (#123456) an image (url(location)) or both where th image is applied and then the background colour is behind it. I'm going to add a colour but you can use a background image hosted on the web if you want to. To add a background colour add the following code.

#wrapper {
width:700px;
height:900px;
background:#ffe2e2;
}

The basic style is complete we now need to place it some where on the page.

Step 5) All style element blocks is the div tags and then id. To place the style we have just created on the page we need to put this into the body of the html code. Add the following lines in the body.

< id="'wrapper'">
< /div>


Div stands for division and is needed. The id stands for the hash and then name we created. You can use class but this will be explained later. The name is obviously the name gave the style.

Step 6) It looks pretty good so far but we could just spruce it up a bit. The first job is the centre it. This is very simple. Surprisingly, there isn't specific code as you would imagine to set the div to the centre of the page. You have to use margins instead. To do this add the following code to the wrapper style.

#wrapper {
width:700px;
height:900px;
background:#ffe2e2;
margin:auto;
}

The auto margin puts the div into the centre of the page.

Step 7) One last thing before I wrap up. It looks a bit "weird" at the top of the page. But this can be change. Using the margin function again we can add in a value. Its very simple add in 50px or a value you chose the margin line. It looks as follows.

#wrapper {
width:700px;
height:900px;
background:#ffe2e2;
margin:50px auto;
}

For any pieces of code that use use to specify a size (mostly padding and margins) you work around clockwise. The first value is the top, the second value (not shown) is the right and so on. For example you could have something that looks like this.

margin: 10px 20px 5px 10px;

That piece of code means that there is a 10 pixel border on the top, 20 pixels on the right, 5 on the bottom and 10 on the right.

To conclude we have the start of a very basic layout. Next time we will fill out the header and main blocks and hopefully we will finish off. I wanted to get further than I have but I wanted to throughly explain everything.

Any questions please ask.

How To Build A Basic CSS Webpage (Part 1)

Hey

Cascading Style Sheets are really cool. They give a lot of control over a website and as a result you can make amazing websites with them. CSS was introduced as a way fro developers to have better control over a websites layout. Currently the HTML 4 that is used doesn't have controls that are good enough. CSS has been developed to combat this.

This first post is going to explain the basic terms and what is going to be set out. Tomorrows post will include building the page possible the day after will include more advance features. It is really easy to do this. All you will need is a text editor and a web browser.

The Layout

Any good website is laid out on paper. This is usually so you know a reference on how to make things work and how they will be laid out. It is really important that you know what you want. Otherwise your website my not look as good as it could be.

The layout we are aiming for is going to look some thing like this.

Each div area is a small defined section that has its own properties. This type of website is also called referred to as blocks. Each part (all 6 sections) will be specified its location, padding, margins, colour, and possibly size. Content can then be added to this sections.

The Terms

If you are new to CSS there are a couple of terms that you may not have heard of.

"Div" means division. A div can only appear once. You could write them more than once but you may get errors.

"Class" you can also style some text in the style sheet but use a class tag. Class tags can appear more than once and are more commonly used for text.

Style Sheet

Quite a big part of CSS is the Style Sheet. A style sheet is referenced in header head sections. You insert the code into this sheet and then reference it in you main part of the HTML. The reason of this is that it cuts on code. You can remove a lot of the same code by having one class and referencing it.

Tomorrow

Sorry this is just a quick post. But I am short on time. Tommorow I will introduce how to build a page out of CSS. It is not very hard to do. You should get the hang of it in no time.

Automatically Generate CSS

I'm a bit of a noob when it comes to generating good working CSS for websites. So after searching the interweb, I've come across this website, it enables you to generate and test CSS for your website.
Click to Enlarge

The above image shows what you can change and mess about with. Below is what this website would look like if I didn't have any design styling.

Click for Fullsize

Looks a bit like MySpace. Enjoy.