Showing posts with label Vector. Show all posts

Go Media Pack 9 Out!

Hey There

You may remember a long time ago that I posted the awesome GoMedia packs and why you should buy them. Anyway to cut a long story short, the team have released another pack. GoMedia Pack 9. In a similar format to the previous packs, pack 9 offers 7 sets of high detail scalable vectors that can be yours for only $52. A bargain. You can, of course, buy any of the packs individually if you don't want to spend that much. Below is a couple of pictures of what you get. The main pack contains, Hooladanders 3, Heraldry 2, Abstract Halftones, The 80s, Western, Signs and Flowers. My favourite is the The 80's pack, it looks so cool. I just need to save up some money. It should go great with the other packs I have bought. Anyway you can check out the main page for all of the sets. A great set to add to any collection.


How To Use Bought or Downloaded Vector Files

Hey

A couple of days ago I mentioned how you use downloaded vector files. For a new user into buying and user vector files this can be an "interesting" experience. I am going to show you what you get and how to effectively use them.

I am going to use an example from Go Media. They are great vectors and from my stats I can see that many of you have bought them. I hope you enjoy your purchases. Anyway if you head over to the free section you can download a sample file. This is the one I will be using for the mini tutorial.

What you get when you download the file is a .eps file. This is a file that can be read and wrote to from all vector packages (even photoshop can do it). Its not application specific so you shouldn't be tied down, unless you have a really old software. Each of the sets you buy will have a seperate file named appropriately.


When you open the file you get all of your vectors. My version of illustrator comes up with a text warning, usually you can skip the warnings because what you want is the vectors and not the fancy text.

The vectors you buy will come a bit like this. Each one is placed on the sheet read for you to use.


Using the vectors is quite simple. You simply select the one you want with the selection tool (Black arrow (V)) and copy to the clipboard. There is no need to place the file in a special folder or configure you software to read the file in any way. You just get the vector you want and you can be on your way. Super simple.


Some general tips.

Save a back up of the file. Always do this. Some sites only let you download the vector file once, may be twice. If you don't have a backup and you delete the vector off the file you are screwed.

If possible set the file to read only. This can usually be done by right clicking. Enabling read only is similar to having a backup, you are less likely to change it.

All in all vector files which you download are very simple to use. They are read to be used and can be applied straight away.

If you have any comments, problems, tips or tricks please leave a comment below.

Go Media's Arsenal Of Amazing Vectors

Hey

I like to use Vectors a lot. They offer superb quality. You don't, like with many stock images, get rough lines or pixelated edges. As a result they can be scaled and used for virtually anything. This post today is going to be about a vector site which offers fantastic quality vectors for extremely cheap prices. Call Go Media's Aresnal they hold some of the best vectors around. I'm going to go through some of the packs today in this post, and show you what you can get. You will be amazed.

The Sets

Go Media has divided the vector arsenal they hold into 8 outstanding sets. Each set contains 7 or 8 smaller packs (these can be downloaded individually). The prices range from $15 for the individual sets and $50 for a complete set. You can pay over $350 for every single vector they own. There is a couple of thousand for every single one.

Whats In The Sets?

Each big set is split into small subsections which contain a vector file with all of the individual shapes and vectors contained on it. I will take set 6 as an example of what is included.

If you decided to buy vector pack 6 you get a downloaded zip file of 16mb. In this file there are 7 eps files. Eps files are a standard export of Vector files, they contain all of the information which can be used in Illustrator or any other vector program. Even Photoshop can handle them.

Each of the 7 files contain all of the individual vectors which you can copy and paste to your your work. Each of the 7 .eps files is on a different theme. You can buy each of these theme packs separately but you don't get the multi buy discount.

Contents

As I am focusing in on set 6 I will show you the specific contents of the vector set. All of the other sets are similar, they just contain different vectors. Set 6 contains:

Line Work

If you have every tried to make very detailed lines within Illustrator you may find that it becomes difficult. Problems usually arise trying to get all the lines perfectly lines up. Save your self some work.


Radial

Very similar once again to the lines these are fantastically detailed spirals and circles. They make great backgrounds.


Heraldry

Anyone wanting to do something medieval or wants to simply use dragons, lions, eagles, crowns, feathers, etc. This is an amazing pack that has a lot of detail. The only down side is they do lack in number. You only get 22 compared to the other packs which contain a lot more.

Destroy 2

As the packs are designed to follow on from previous installments this is the second type of pack with the in a similar nature. I would personally have named this grunge, as it is very grungy, dirty and distressed. Used best for overlaying on art work. They add cool texture. A very versatile pack.

Skylines

Ever need a skyline to set off that city background? This pack is probably what you need. Based on New York City, Cleveland, San Diego, Atlanta, Boston, Philadelphia, Houston, Dallas, Detroit, Chicago, Los Angeles, Minneapolis, and Miami (although I can tell the difference) they add a fantastic skyline feel to any piece of work.

Scribbles

Surprising difficult to make. The scribbles pack is just that, scribbles. The .eps packed with over 50 different scribbles can be used for nearly anything. Although they may not seem useful they can be used for nearly anything. They contain a nix of grunge and illustration you can find many uses for them.

Anatomy

Probably the most detailed of any set this set is all about the anatomy of a human. It contains vectors on spines, bones, hands, feet, heads. All sorts. If you need a piece of human to set of a piece of work. This vector pack is definitely the one you want.

How They Come

So you have download the vector pack and you have parted with your money but how to they come? Each and very one of the vectors will be on a vector file. You can then pick the one you want copy it to your clipboard and use it as you please. I will be doing a more detailed post on how to use vector packs in the future.


Want Some Free?

No site would be anything if you couldn't sample there offerings. If you want to download a sample vector file, similar to the one above head over to the Freebies section. They have a free vector pack which contains a small sample from every single pack. Really useful as you can see the level of detail they contain.

Conclusion

Go Media's Vector packs are definitely the best ones around. They offer a superb quality for a very cheap price. I would urge you drop buy and check out there products before even considering looking anywhere else.

VectorMagic. A Cool New Tool.

Hey

There is a really cool new tool out on the internet that can be used to help you vectorise any image. It produces really interesting and accurate results and is a lot better than the ones used by Illustrator. This new magical tool is called Vector Magic.

This online tool is designed to turn any inputted image into a vector image. Its very simple to use and the results can be retrieved off the server in under a couple of minutes. The engine works best with simple image with few colours. I've found that these result have come out the best. Photos which can also be upload, can be turned into vector but usually result in very jaggy edges between each of the paths.

There are only a couple of options to pick when uploading an image. Low, Medium and High. Low as the name suggests is done the quickest but produce the worst results. This isn't necessarily bad, if you want a quick starting point to work from. Medium and High do produce very accurate results. The high option usually results in hundreds of paths and shapes on your canvas. This can be useful if you want a very detailed image but is a pain if you want to edit your image afterwards.

Check it out see for yourself how it works. I'm sure you will be able to find a use for it. Vector Magic.

Vector Digital Maps To Download

Hey

I like maps and vectors so whats better than vector maps to download. The ones i've found are amazing quality and are at a very reasonable price of $50. For example this pack includes maps of countries, American states and a world map. Nearly all the maps are availble in either Illustrator Ai, Gif, Jpg, and editable PDF. These are really high quality and are either in full colour or single colour as shown below.


If you think this is a really cool product to buy because I can think of hundreds of uses for this product. You can download this product here for a limited time only price of $49.

Happy mapping.

Drawing Homer Simpson In Illustrator

Hey
Homer Simpson
Illustrator 
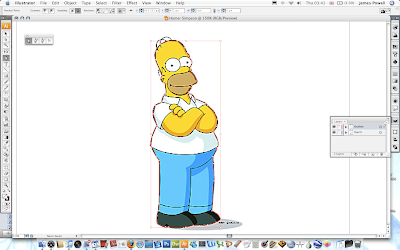
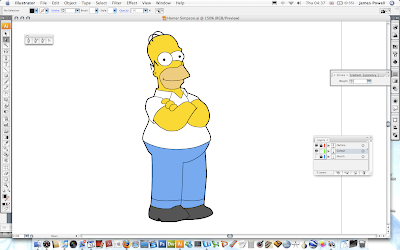
is a great program. It offers so much versatility in creating vector images. Hence why it is the top vector program out there. As a beginner to this program I want to share with you a tutorial that is simple to follow that you can use to draw Homer Simpson of 
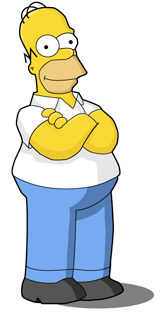
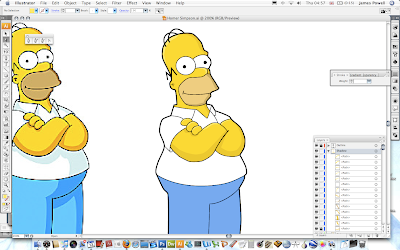
The Simpsons. It is really easy to do but it does take a long while if you want to get it correct and good looking. What we would hopefully be working towards is something shown on the right. That image is lifted directly out of I had made. All the included colours will be given although you can download the swatches from the source file if you want to load them directly. If you want to see any of the image screen shots full size please click on them.

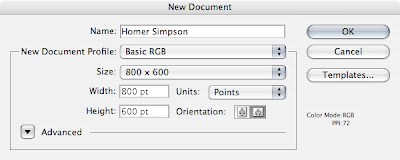
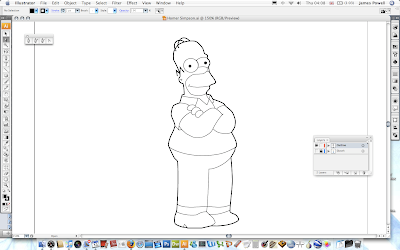
Step 1 is simple create for canvas and suitably name it. A size under 800 x 600 is perfect because the source file we will be working on isn't the best of quality. Remember to save the file once as you click OK. You don't want to lose all of your work because you didn't save your file.

Drawing Homer Simpson In Illustrator
You next need to create a layer for the background image that we are going to trace. Rename the existing layer (If you need your layer palette up go Window > Layers) and naming it something useful (and spelled correctly (D'Oh)). The next step is to lock the layer by checking the tick box. Locking the layer prevents you from moving it are changing any of the attributes when working.

Drawing Homer Simpson In Illustrator
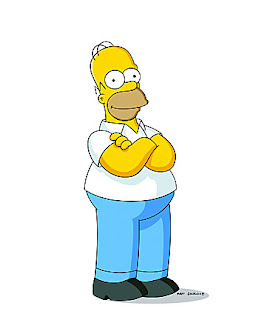
The next step is to copy and paste or place the image below onto this layer. You can either resize it to a large size if it is to small or leave it as it is. Drawing Homer Simpson In Illustrator
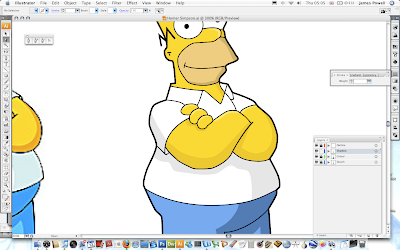
You should have something that looks like this. When you lock the layer there will be a small pad lock by the eye. If can always click and unclick the pad lock to edit and change the layer as necessary. This will be done numerous times to different layers.

Drawing Homer Simpson In Illustrator
The next step is to start drawing. Use the Pen tool (P) and set the stroke to about 2. Change this depending on the size of your image. One thing to remember is that a thinner line will be added on to the image later.

Drawing Homer Simpson In Illustrator
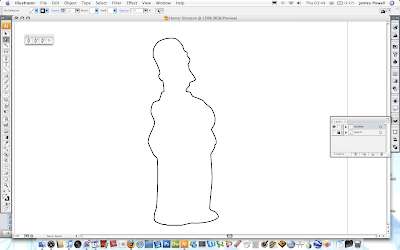
Once you have selected the pen tool create a new layer. Name it outline. The carefully draw around the outline of Homer. Make sure that you adjust the curves as needed with the White Pointed Tool (A).
Drawing Homer Simpson In Illustrator
Once you have spent some time carefully adjusting the image you should have a good outline. Through out the creating of this tutorial I was always going back and changing the outline to look both good and fit to the original sketch.

Drawing Homer Simpson In Illustrator
You now need to reduce the stoke size of the brush. The inner lines are smaller and thinner due to the detail.

Drawing Homer Simpson In Illustrator
Again, follow the sketch outline using the 1 stroke brush. One thing to note is that the left eye is better if you use the ellipse tool. It is easier to get the round shape.

Drawing Homer Simpson In Illustrator
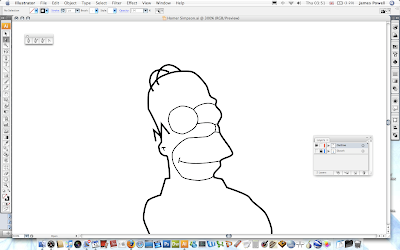
Continue down the body tracing the image as necessary. The more time and effort you put into getting all the lines to match up is vital. The image does look better in the end. Remember to add in the backs of his eyes.

Drawing Homer Simpson In Illustrator
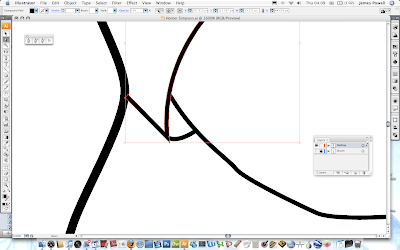
One thing that might become apparent when drawing your image is problem areas due to the edges of the brush strokes. The one below is shown be his sleeve opening. This can be solved in an easy way.

Drawing Homer Simpson In Illustrator
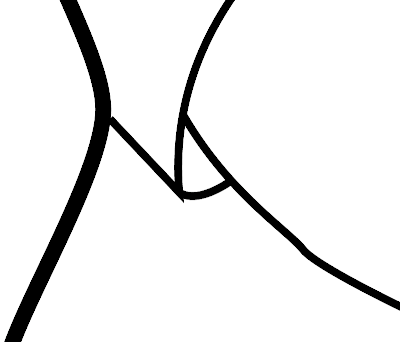
Go Object > Path > Outline Stroke. The converts the single line to a block shape. You can then move the points by hand to match up and cover up any errors.

Drawing Homer Simpson In Illustrator
You can then move the points and make the sleeve look better.

Drawing Homer Simpson In Illustrator
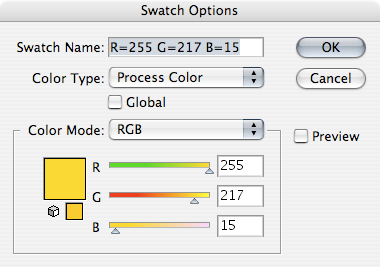
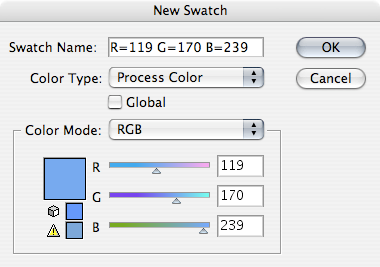
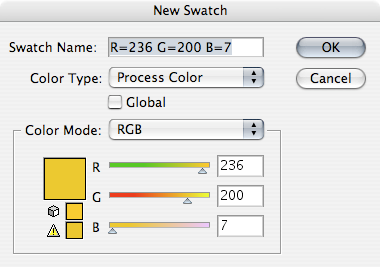
The next step is to start creating the coloured skin. Homer Simpsons skin is defined by the colours below. You can use the colour palette included in the source pack.

Drawing Homer Simpson In Illustrator
Begin by making the colour the yellow you just created and the stroke to 0 or the colour invisible. Use the pen tool.

Drawing Homer Simpson In Illustrator
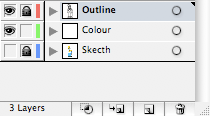
Create a new layer. Name it colour. Lock the outline layer so you can't change it while you are working on the colour layer.

Drawing Homer Simpson In Illustrator
Go around the outline of skin with the pen tool. You don't have to be to careful when you make the points as along as all the skin is filled in and there is no white bits left.

Drawing Homer Simpson In Illustrator
You need to continue with other parts of his skin. The beard is RGB 238, 205, 128. You can download the colour values from the source pack.

Drawing Homer Simpson In Illustrator
The next step is to move onto his feet and finally on to his shoes. The blue used will be slightly different and darker to the original used in the sketch. The colour values are shown below.

Drawing Homer Simpson In Illustrator
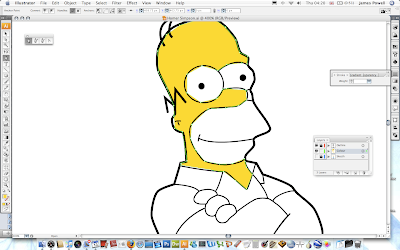
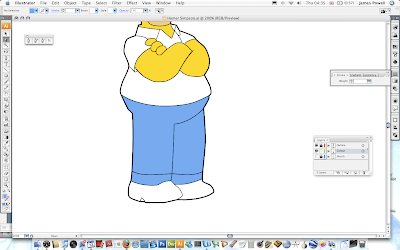
He is starting to come to look good now.

Drawing Homer Simpson In Illustrator
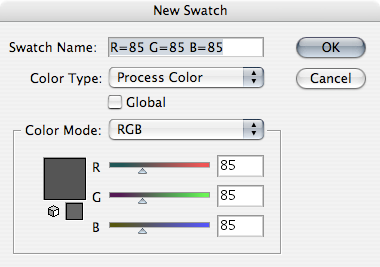
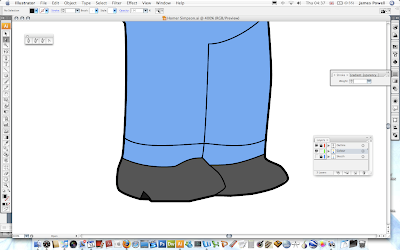
The final part of block colouring is to do his shoes. These are dark and use the colour values RGB 85, 85, 85. Again use the pen tool and go around the shape of his shoes.

Drawing Homer Simpson In Illustrator
They are coloured in a look like so.

Drawing Homer Simpson In Illustrator
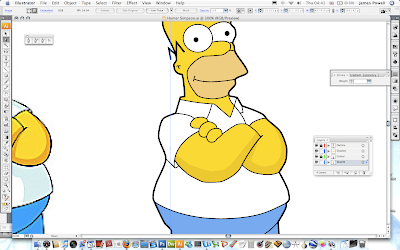
He really does look cool at the moment and hopefully should yours. Give yourself a pat on the back for you good work. But you can make it even better with some shadows.

Drawing Homer Simpson In Illustrator
The shadows use the same basic colours but are darkened. These colours are not in the source pack so you have to make them yourself.

Drawing Homer Simpson In Illustrator
These is where your artistic talent comes in. Use the pen tool again with no stroke and the fill set to the shadow colour. Make and out line shape of the shadow and use the reference image as a source. I've moved the sketch image off to the left so I can easily refer to it. Use a new layer if you want to.

Drawing Homer Simpson In Illustrator
Continue around all parts of the skin.

Drawing Homer Simpson In Illustrator
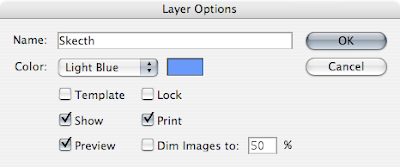
If you look at the layer palette below i've locked all but the shadow layer I am working on. By the way the path under Shadow shouldn't be locked. I clicked the button by accident before taking the screen shot.

Drawing Homer Simpson In Illustrator
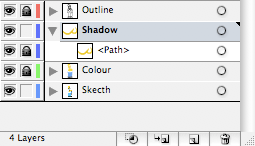
Although from the screen cap it may be difficult to notice all of the skin has a shadow.

Drawing Homer Simpson In Illustrator
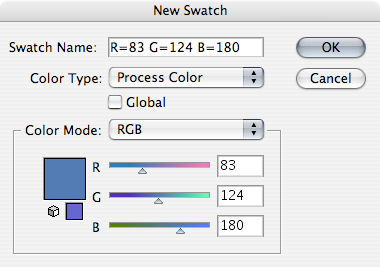
Continue now with the shadow of the trousers. The colour shadow is RGB 83, 124, 180. Again create a shadow by following the sketch image as a source.

Drawing Homer Simpson In Illustrator
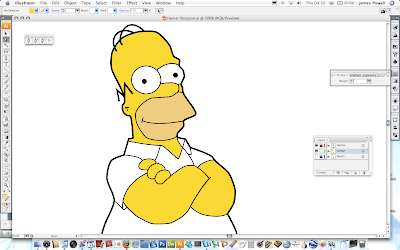
The shaodws really bring the image to life and they look a lot less 2D.

Drawing Homer Simpson In Illustrator
You need to do the same with the grey for his t-shirt. I've used the default light grey that is included with the colours with Illustrator.

Drawing Homer Simpson In Illustrator
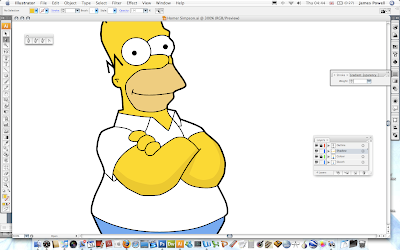
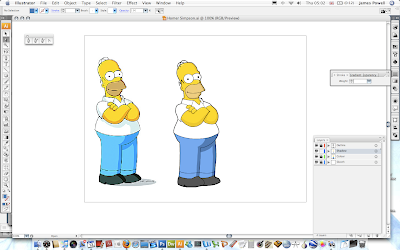
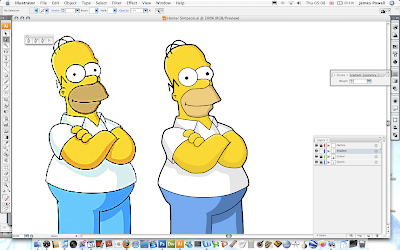
At this point my homer looks very similar to the original copy.

Drawing Homer Simpson In Illustrator
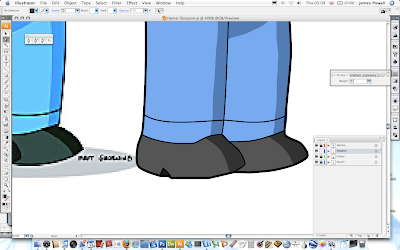
You need to do again the shadows on his feet. I've used another of the default greys.

Drawing Homer Simpson In Illustrator
All you need to do now is finish off by sorting out any stray lines. I've added some text for extra effect (and people no I did it). As well as this there is also a shadow. This again uses one of the greys built into the colour palette.

Drawing Homer Simpson In Illustrator
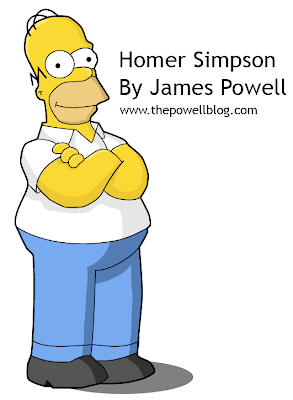
Now this image is by no way perfect. There are little blips that could be sorted out but other wise it is really cool. Please leave your comments below.